PostgreSQL Hosting on EC2: Configuring Automated S3 Backups
Consultant at EY
The primary reason for hosting your database on EC2 is cost savings. At the time of writing this article, the most affordable/smallest RDS deployment costs approximately $20-$40 per month (depending on the usage).
In contrast, you can utilize a t2.micro EC2 instance with 8GB of storage for approximately $8-10 USD per month. This expense can be further reduced by opting for reserved billing.
However, if your budget allows, it's always advisable to choose RDS. It offers replication through a standby instance in a different availability zone, includes automated backups out of the box, and manages automatic failover.
But if you have budget constraints or are prepared to handle and manage your own Postgres instance, EC2 presents a viable option.
An integral aspect of effective disaster recovery and preparation procedures involves automatically generating backups for production databases.
This article will demonstrate how to launch an EC2 instance, establish a dedicated PostgreSQL database, and implement automated backups to an S3 bucket while adhering to proper security protocols.
Prerequisites
- An AWS Account (duh).
Launch an Ubuntu EC2 instance
First, navigate to the EC2 console and proceed to create an EC2 Instance using the following steps:
Initiate the process by clicking on the
Launch instancesbutton.Assign a name to your instance and opt for the
UbuntuOS image. Make sure to choose a Free Tier eligible AMI, which might already be pre-selected.Opt for the
t2.microinstance type.Generate a new key pair and save it locally. This key will be necessary for SSH access to your instance.
Under the
Network settingssection, click theEditbutton to adjust your security group settings according to the following instructions: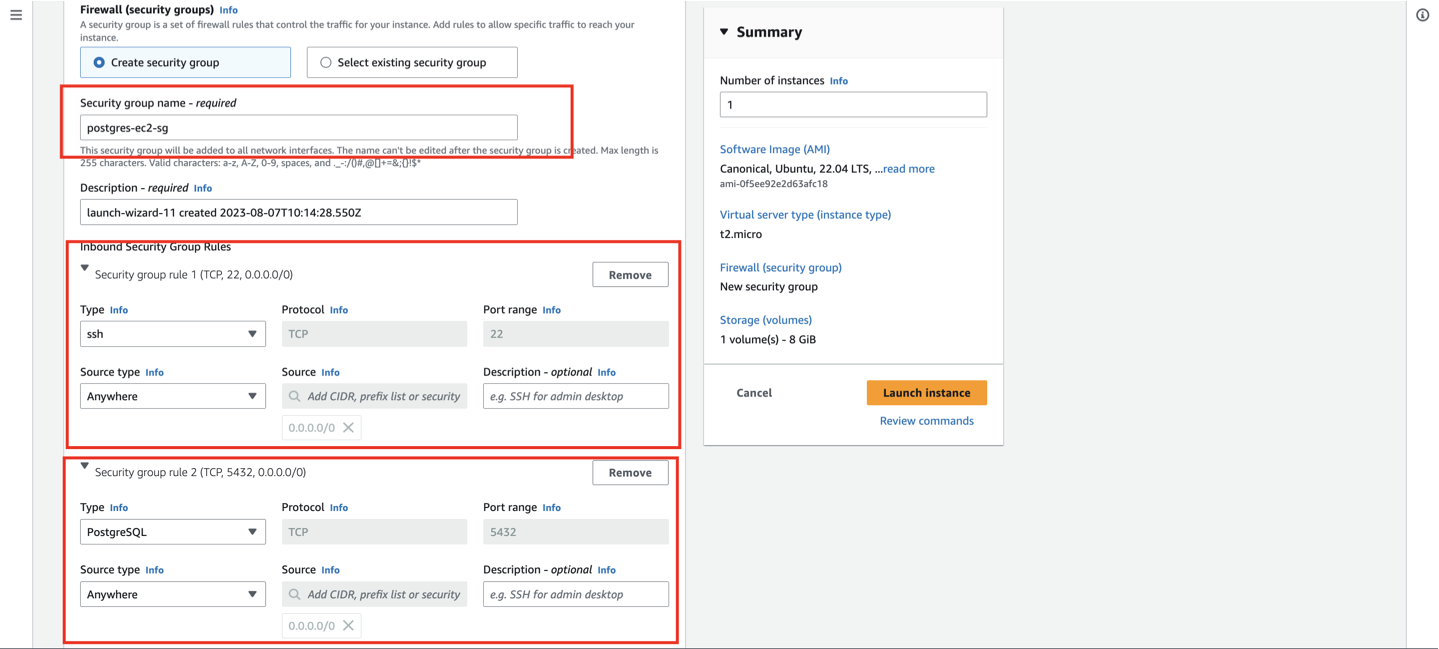
We need to enable
SSHandPostgreSQLaccess for the EC2 instance, as we will be accessing the EC2 instance through a Postgres client such aspgAdminor a server on port5432.
NOTE: While I am currently setting the source as
Anywhere (0.0.0.0/0), in a production environment, please ensure that you add your server's public IP address to theSourcefield. This step is essential to restrict access to the DB on port5432only to your server.
- Keep the other settings as it is and click on
Launch instance
Install PostgreSQL on the EC2 instance
Now, we will install Postgres on our Ubuntu EC2 instance.
To do so, let's SSH into the EC2 instance. For this, we need the .pem file that we downloaded before launching the instance. Move that file to your Desktop.
Open your terminal on the Desktop and execute the following commands:
chmod 400 <ssh_key_name>.pem
ssh -i "<ssh_key_name>.pem" ubuntu@ec1-11-111-111-11.ap-south-1.compute.amazonaws.com
# Add your EC2 public IPv4 DNS in the place of `ec1-11-111-111-11.ap-south-1.compute.amazonaws.com`
Once you are inside the Ubuntu instance run the following commands:
sudo apt update
# install postgres
sudo apt-get -y install postgresql
Once the installation is complete, the next step is to create a password for the default user postgres
sudo su postgres
# this will switch to superuser with `postgres` as username
postgres@ip-111-11-11-111:/home/ubuntu$ psql

# psql will open interactive terminal to work wil Postgresql
# create a password for default user
postgres=# ALTER USER postgres password 'mypassword';
# To quit psql and exit postgres user:
postgres=# \q
postgres@ip-111-11-11-111:/home/ubuntu$ exit
Please use a strong password instead of mypassword. Once the new password is set, you will receive a confirmation in response as A"ALTER ROLE" on the terminal.
At this point, you have successfully installed and configured an instance on an EC2 Server. Next, we need to configure a few more permissions to ensure that the PostgreSQL instance is accessible publicly from any IP address.
Please run the following command in your Ubuntu instance:
cd /etc/postgresql/<postgres_version_number>/main/
# for me the version number is 14 so it was cd /etc/postgresql/14/main/ for me
ls
You will find the following files in your main folder

Using the Vim editor, add the following line to the pg_hba.conf file.
Run sudo vim pg_hba.conf and add the following line to the pg_hba.conf.
host all all 0.0.0.0/0 md5
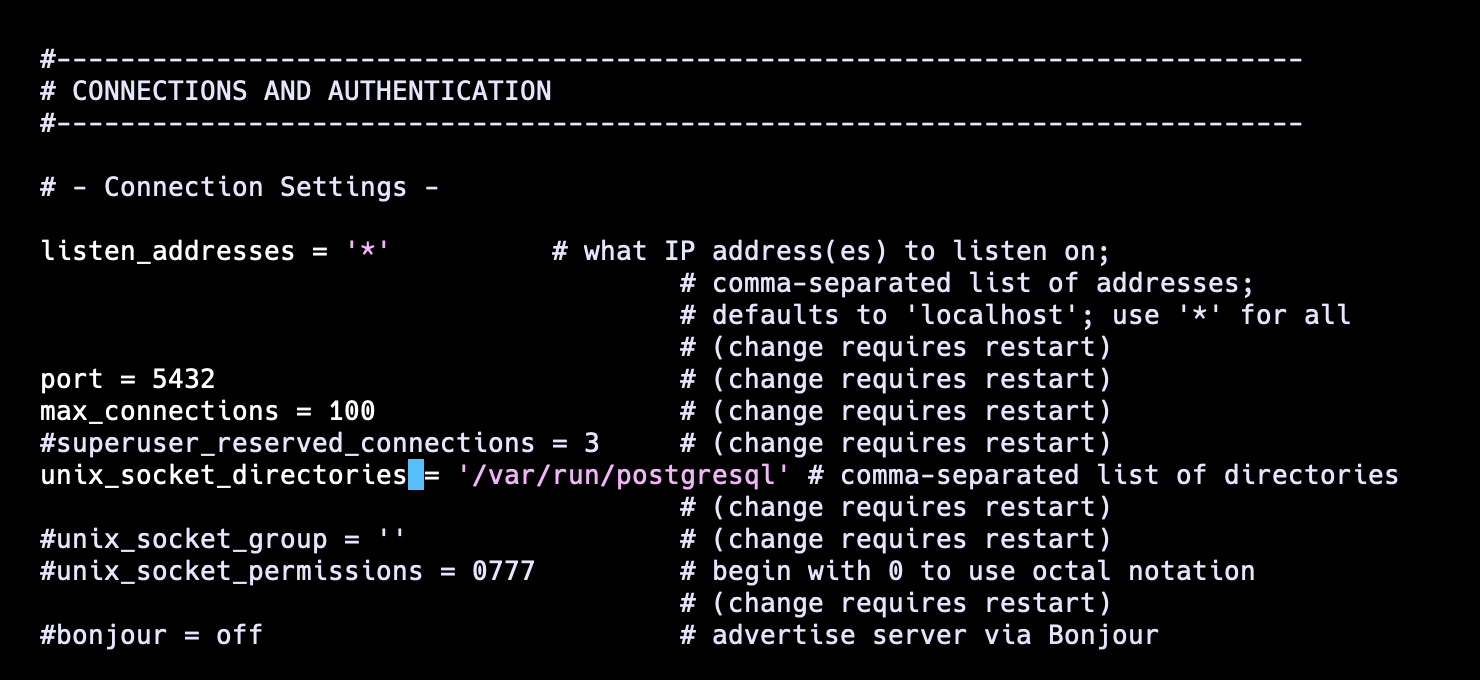
Once you've added the above line, proceed to open the postgresql.conf file from the main folder using Vim. Locate the line listen_addresses='localhost'.
Uncomment this line as demonstrated below and substitute localhost with *.
Now, cd into ~ and restart the Postgres by running the following command:
sudo service postgresql restart
This concludes our initial setup of the PostgreSQL server on the EC2 instance. You can now utilize the public IP address of the instance to establish a direct connection to the PostgreSQL server that we have just installed.
Next, let's proceed with the process of setting up automated backups on S3 using the pg_dump.
Install pg_dump on the EC2 instance
Run the following command inside your EC2 instance to install pg_dump
sudo apt install postgresql-client postgresql-client-common libpq-dev
Once done, check the version of the pg_dump which is installed
pg_dump --version
# pg_dump (PostgreSQL) 12.14 (Ubuntu 12.14-0ubuntu0.20.04.1)
Create a .pgpass file
The file .pgpass in a user's home directory or the file referenced by PGPASSFILE can contain passwords to be used if the connection requires a password without manually entering it.
The file should contain a line in the following format:
hostname:port:database:username:password
To do so, make sure you are in your home directory or run cd ~.
Then create a .pgpass file by running touch .pgpass. This will create a new file in the home directory.
Now, let's add the required information in the given format.
Run sudo vim .pgpass. This will open an empty Vim editor. Enter the following line.
<ec2_instance_public_ip>:5432:postgres:postgres:<password_you_set>
Once done, click ESC and type :wq to save the changes.
Next, set the appropriate permissions for the .pgpass file by executing the following command.
chmod 600 ~/.pgpass
Install AWS CLI
Now, in order to enable automated backups to the S3 bucket, we need to execute certain commands that require the installation of the aws cli on the machine.
To proceed, execute the following commands:
curl "https://awscli.amazonaws.com/awscli-exe-linux-x86_64.zip" -o "awscliv2.zip"

sudo apt install unzip

unzip awscliv2.zip

sudo ./aws/install
Setup an S3 bucket for backups
In the Amazon S3 console, we will first create the bucket that will host the backup files.
in this case, I will go with the bucket named postgres-backup-bucket. Note the ARN of the bucket that is created as we will need it soon enough.
NOTE: Make sure you do not enable public access to this bucket!
Create an IAM Policy to control access to the S3 bucket
Open the IAM console in AWS, then under Policies click
Create New.In the resulting screen, click on
{} JSONand paste the following (replacing<arn of S3 bucket>with the ARN of the bucket created in the previous step):
{
  "Version": "2012-10-17",
  "Statement": [
    {
      "Sid": "VisualEditor0",
      "Effect": "Allow",
      "Action": [
        "s3:PutObject",
        "s3:GetObject",
        "s3:ListBucket",
        "s3:DeleteObject"
      ],
      "Resource": [
        "<arn of S3 bucket>",
        "<arn of S3 bucket>/*"
    ]
    }
  ]
}
- Name the policy
GrantAccessToBackupBucket.
This bucket does exactly what the name suggests, it allows whichever IAM principal this policy is attached to have read/write access to the S3 bucket setup to receive the backups.
Create an IAM Role that is attached to the GrantAccessToBackupBucket Policy
Return to the IAM console, open up the Roles page and click
Create Role.On the resulting screen, select
EC2as the Service, then click Next.On the permission screen search for the policy named
GrantAccessToBackupBucketand attach it.Next, we give our new IAM role a name
PostgresSQL-EC2-S3-CRUD-Role
What we’ve done in this step is create an IAM role that can be attached to an EC2 instance.
This IAM role will enable the EC2 instance to transparently read/write to the S3 buckets for our backups without requiring us to do any configuration inside of the machine itself.
Attach the IAM Role to the EC2 instance
Open the EC2 console, identify the Ec2 instance hosting the database, click on it and then under
Actions -> Security, selectModify IAM role.On the resulting page search for and select the IAM role named,
PostgresSQL-EC2-S3-CRUD-Role.Click Save.
At this point, we’ve now set up our EC2 instance to have read/write access to the S3 bucket being used for backups.
Note: up until this point the instructions I’ve laid out are pretty generic and have nothing to do with database backups, you can follow these steps if you are building an app and want your backend code to be able to read/write to an S3 bucket.
Create a backup script on the EC2 machine
SSH into your EC2 machine.
Create a new file named
backup-db.shGrant execute permissions on the script by executing:
chmod +x backup-db.shOpen up the file and paste the following:
  # Create the backup file
  TIME=$(date --utc "+%Y%m%d_%H%M%SZ")

  # Use the timestamp to construct a descriptive file name
  BACKUP_FILE="backup-pg-${TIME}.pgdump"
  DATABASE_NAME="postgres"
  HOST="<ec2_public_ip>"
  PORT=5432
  USERNAME="postgres"
  pg_dump $DATABASE_NAME -h $HOST -p $PORT -U $USERNAME -w --format=custom > $BACKUP_FILE

  # -h host
  # -p port
  # -U username
  # -w this avoids a password prompt and refers .pgpass file for password

  # Second, copy file to AWS S3
  S3_BUCKET=s3://<backup_bucket_bame>
  S3_TARGET=$S3_BUCKET/$BACKUP_FILE
  echo "Copying $BACKUP_FILE to $S3_TARGET"
  aws s3 cp $BACKUP_FILE $S3_TARGET

  # verify the backup was uploaded correctly
  echo "Backup completed for $DATABASE_NAME"
  BACKUP_RESULT=$(aws s3 ls $S3_BUCKET | tail -n 1)
  echo "Latest S3 backup: $BACKUP_RESULT"

  # clean up and delete the local backup file
  rm $BACKUP_FILE
At this point, manually execute the backup-db.sh file and watch the console log output.
Run ./backup-db.sh and check the console.
It should be pretty clear whether or not the backup and upload succeeded or not. If the process is successful, proceed to verify whether your S3 bucket contains a database snapshot generated by the pg_dump command.
Automate the execution of the backup with cronjob
Open the crontab by typing
crontab -ein your EC2 instanceIn the resulting editor window, we add the following line:
0 0 * ~/backup-db.sh &>> ~/backup-db.log
Note the above cron expression runs the backup script once per day at midnight.
NOTE: If you want to run this at different frequencies then use this handy cron expression generator which will help you in generating the right cron syntax to match your desired frequency.
Test your backup!
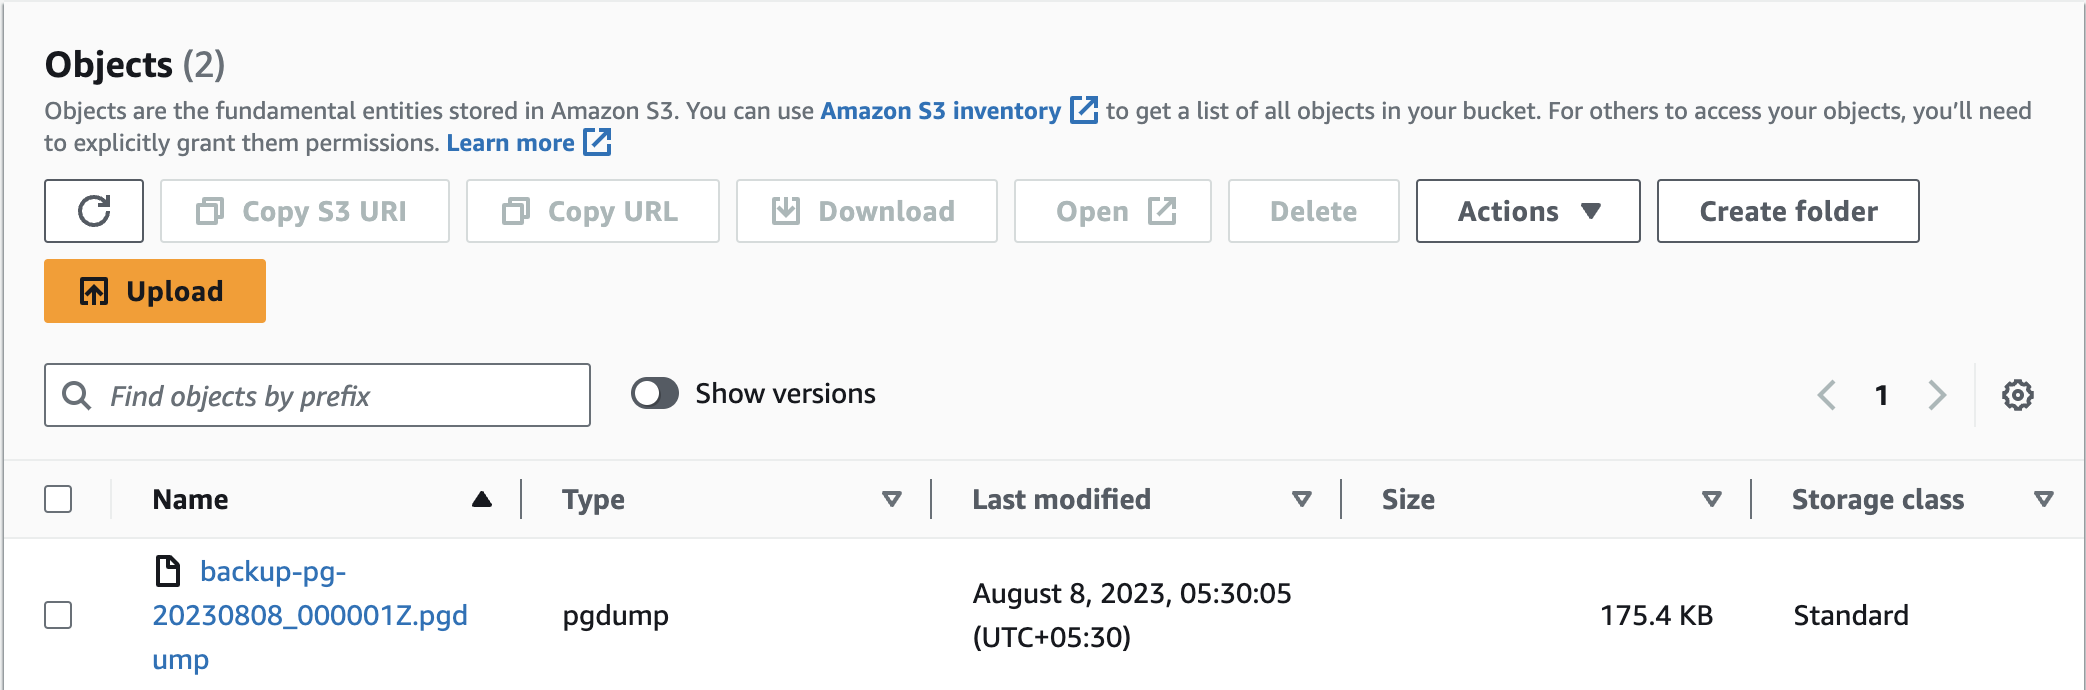
In the image above, you can observe my automated backup, which was generated at 5:30 in the morning. Therefore, congratulations are in order as you now possess a secure and dependable automated backup mechanism.
Conclusion
In conclusion, this blog has explored the cost-effective approach of hosting a PostgreSQL database on an EC2 instance, shedding light on the practical steps to implement automated daily backups seamlessly. By harnessing the power of EC2's hosting capabilities and integrating automated backups, you've unlocked a robust solution that ensures the safety and availability of your valuable data.
Looking ahead, I'm excited to share a forthcoming article that will delve into the intricate process of restoring data from an S3 backup file generated by the automated backup mechanism. Stay tuned for this informative guide, where we'll navigate through the steps to seamlessly retrieve and reinstate your data, ensuring business continuity and data integrity.
Make sure to subscribe to our newsletter at https://blog.wajeshubham.in/ and never miss any upcoming articles.
I hope this post will help you in your journey. Keep learning!